Tuesday, August 29, 2006

Property Bar location using GPS (and Visual FoxPro) Part I

I worked on this project back in the spring of this year (2006). What I was trying to do was find property bars on our property using GPS. When you're out in the forest, it is very tough to keep yourself oriented properly. Looking for a bar that way is like looking for a needle in a haystack. Your best chance to find one is to trip over it.

The idea to use GPS in aiding the search sprung from other projects where I used a GPS to do location logging, plus the fact that there are supposed to be some property bars in our forest which have yet to be found. Now, knowing exactly where our property line is is not that big a deal, just curiosity really, but still. There's an area, particularly in the southwest corner, where I'd like a bit more clarity as to who owns what. It seems funny that this whole area was surveyed about 8 years ago, but now not even 1 bar is to be found anywhere...looks like somebody would rather not have them found.

Anyway, the general idea is as follows:

- have a property plan
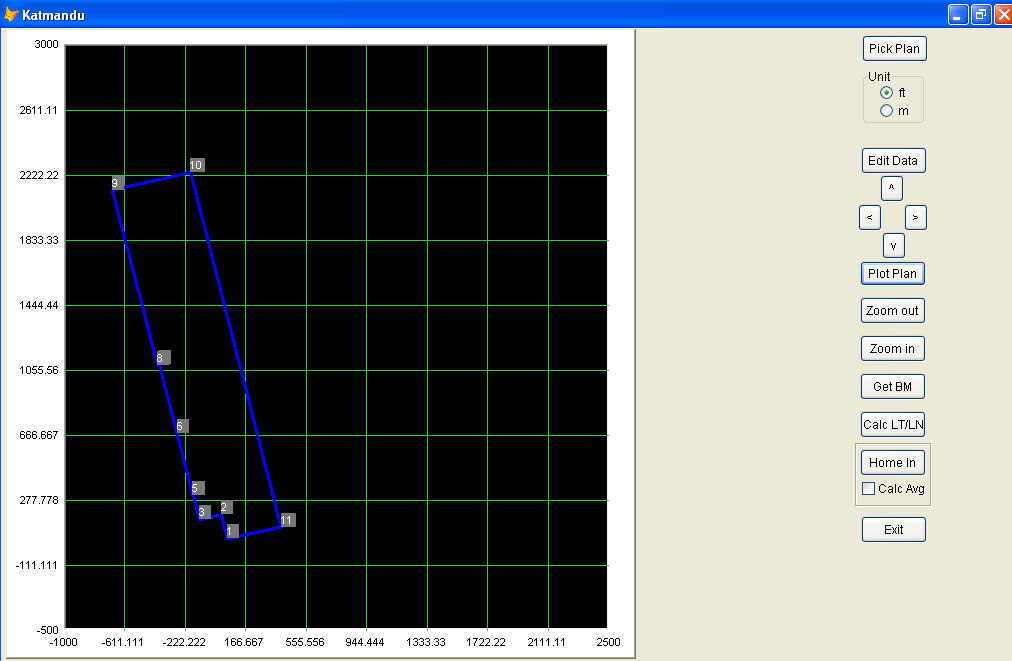
- have a computer program where you can enter the azimuths of the various lines that constitute the property limits as well as the distances between the various points where these lines intersect.
- have the computer plot this plan so that the plot is oriented properly with respect to true north.
- take a GPS and have the computer track and log the information received.
- program the computer so it can establish a latitude/longitude position for anyone of the points of intersection of the plan (a 'bench mark' position)
- program the computer so it, given the latitude/longitude position of anyone of these points, can calculate the lat/long of all the other points on the property line.
- program the computer, so it can plot the current position of the GPS on the above plan.
- program the computer, so it can 'home' in on a certain point, with a computer voice telling you in what direction the to-be-found point is and how far off we are.
- program the computer, so it can provide an average plot of the last number of GPS readings

First off: what is azimuth? This is the direction of a line, measured clockwise around the observer's horizon from north. So an object due north has an azimuth of 0°, one due east 90°, south 180° and west 270°. There, that was easy.

You can tell there was a fair bit of programming involved. The GPS logging stuff I had already done for my previous efforts, so that was re-used. To display the various plots, I used a free ActiveX control called NTGraph. Since we are now looking at Microsoft Vista, the name NTGraph will be more than enough to scare off some people. Not me. I've used it for a number of projects and, although a bit quirky at times, it is certainly very stable and very flexible.

Surprisingly enough, to calculate the lat/long of Point B, given the distance and azimuth to it from Point A, is fairly complex. A fellow by the name of Victor Fraenckel wrote a Visual Basic program to do this. His program was based on T. Vincenty's article "Direct and Inverse Solutions on the Ellipsoid with Application of Nested Equations" as published in Survey Review, April1975. In this article, Mr. Vincenty stated that "In selection a formula for the solution of geodesics it is of primary importance to consider the length of the program, that is the amount of core it will occupy in the computer along with trigonomic and other required functions." Obviously, the term "software bloat" was still to be invented.

Anyway, I rewrote Vic's VB program into a Visual FoxPro library. Then I added the interface around the various parts. But more on that soon....

Sunday, August 27, 2006

Just an observation...

...but why is it, that when the price of gas drops by more than 10 cents (to around $ 0.94 a litre), virtually overnight, no one says anything about this? No mention of this in the newspaper, on radio or TV? No one complimenting the government or the oil companies for doing such an efficient job? Strange. Just an observation though, I didn't mean to criticize anyone.

Sunday, August 20, 2006

Finishing up the bedroom basement

Back on June 11th, I did an analysis of basement subfloor options and then decided to go with a product called OvrX. OvrX comes in 2 x 2 feet tiles. The product itself is a 1/2" Styrofoam layer mechanically bonded to 5/8" OSB. The styrofoam has grooves cut (or ground might be a better term) on the bottom, to allow for air and moisture to pass through. Total thickness is 1 1/8" or 29mm.

So off to the local lumber yard I went. I ordered the OvrX and lo and behold, they had it in stock. I was able to load all 43 tiles (i.e 172 square feet) into my little Echo, so I guess you could call that an advantage.

Now, when I got futher into checking out the condition of the walls and the insulation contained within them, I just made an on the spot decision to tear it all out. Like Mike Holmes would say: "It's all gotta come down!". On the outside wall, there was about 1" of beaded styrofoam, but only at the upper 3 feet, the rest had nothing. This was overlaid with, count them, 2, not 1, layers of drywall. The drywall was held up by 2" x 2" strapping. The beaded styrofoam sat between this, with lots of air gaps. In addition, some of the inside walls had mould on the bottom of the drywall. Not a good situation. The fun part about ripping out drywall is that it goes very quickly. The drudgery part is cleaning it all up. Next came the strapping. Down to clear bare concrete walls.

I decided to do the outside walls with extruded polystyrene, commonly called styrofoam pink. These sheets I applied straight onto the concrete wall. That way, you have an continuous, uninterrupted insulation barrier. No gaps, no nothing. If you cut the sheets just a fraction too wide, they'll stay in place because of the friction fit. No glue or anything necessary. Somewhere I had read that you should then apply 1 x 3 strapping every 2 feet and attach your drywall to this. I followed a slightly different technique by using plywood instead. I went to the lumber yard, bought a sheet of half inch plywood, then asked them to cut it into 12 strips of 3 7/8, which they were happy to do of course at $ 0.50 a cut. Then I simply applied these strips to the wall instead of the strapping. The reason I did this is because the 1 x 3 strapping tends to be very cheap spruce, and when pierced by drywall nails, it can split very easily. When this happens, its holding power is obviously severely diminished. This will not happen with the plywood. By the way, I attached the plywood strips to the wall by first drilling a hole through the plywood, the styrofoam and then finally into the concrete, making sure that the total depth of the hole was a minimum of 3 1/4". Then I used 3 1/4" Tapcon screws to do the final attachment. Overall, the wall operation (i.e.styrofoam and plywood strips) went fairly smoothly. The pink styrofoam is easy to work with. It comes in shiplap, and to accommodate electrical cables, I simply cut off the shiplap from one piece and routed the cable through the channel that became available because the shiplap was no longer there.

Since I used 1 1/2 styrofoam, the total insulation value of the outside wall from top to bottom is R 7.5. Not quite code, but a heck of a lot better than before.

Next, I applied the OvrX. Hmm, wish I could say this was a snap to install. Unfortunately, it wasn't. I had one heck of a time keeping the tiles aligned. The tiles are tongue-and-groove and I suppose that it doesn't take much for OSB chips to clog the tongue, forcing you to bang away at the other end of the to-be-inserted tile. Too much banging puts the previously laid tiles out of alignment and so round and round we go.

In hindsight, what I would have done is attach the first couple of tiles to the floor with Tapcon screws. That way they would be kept nice and steady and theoretically wouldn't budge easily. So I struggled at floor level, tapping and banging and cursing, all at the same time. I took me about 4 hours to do a 160 square feet floor, not exactly record speed, in fact very slow. When almost done, I discovered that using a piece of 2 x 2 and a sledge hammer, I could lay the tile while standing, which made for quite an improvement in my working conditions.

It is also very hard to get the last row to fit in properly, since you have no 'banging' room. I used a tool for applying laminate flooring to get at least some leverage, but still, it was a struggle. In the end, I decided to drive some Tapcon screws through some of the pieces where the seams weren't all that close together. This is something I rather would not have done.

I had run a temperature check on that room, prior to laying the OvrX tiles. Over a 24 hour period, the temperature difference between ceiling and floor temperatures was close to 4 degrees. After the tiles were laid, this difference went down to around 2 degrees. Once the laminate floor went in, it further decreased to 1.5 degrees.


Next on the agenda was the drywall. I wanted to minimize the amount of joints required and so we used 12' sheets for most of this. Ronny helping me out with this made it all that much easier. Taping and mudding went fairly easily, along with applying primer paint. I don't know about the finish paint, as the design for that and the application of it was done by Amanda!

The laminate floor went in without a hitch. Then I hung the doors (huge pain, as everything is crooked!) and applied the trim, caulking and painting. Now it's done. Almost. The brown cabinet hiding the electrical panel still needs to be painted white. But then, you should always leave something to look forward to, shouldn't you?


Tuesday, August 15, 2006

Weather not fit for any umbrella


Mid summer was not a good period for our lawn furniture. Let me explain why.

- On July 2, a short, but violent mid afternoon thunderstorm managed to create havoc with the above named furniture. Specifically, the backyard table, complete with umbrella, the lawn chairs, the single pole umbrella as well as Anne's new installed 'book case' with glass shelves were all blown over. The single pole umbrella had 2 70 kg blocks of concrete holding it down, to no avail. You can see one of the blocks thrown over the side of the deck by the force of the wind. We were able to repair the umbrella by attaching of piece of aluminum to the only rib that was broken. We placed the umbrella back on the deck and, as further reinforcement, added a couple of lag bolts screwed into the deck to hold it down more. We cleaned up the rest of the mess. Some damage was done, but not too bad.


- July 15th was a bit windy, but otherwise a beautiful summer's day. Ronny and I were installing a cabinet in the shed and Anne was watering the flowers on the deck. All of a sudden we hear her scream. We look over and the next thing you know, we see umbrellas flying everywhere. What I suspect happened is that this was a dust devil, a mini tornado, minus the dust, so invisible otherwise. It did just a fine job on the single pole umbrella: the concrete blocks and the lag bolts didn't budge this time, but something had to give so it was the top pivot point, where the umbrella is fastened to the post, that gave way. It was twisted at about a 45 degree angle, making the entire umbrella useless. Solution: demolish it. Ronny got to use his brand new hack saw on the aluminum posts. The table umbrella magically survived again.

- July 20th. Well, we needed shade on the deck, 'cause otherwise it is hotter than blazes back there. I made the mistake of reading the Canadian Tire flyer, in which I spotted a four poster 'sun shelter' for only $ 50. After some humming and hawing in the store, I decided to buy one. Another mistake. After we got it home, we noticed how extremely flimsy it was. We got it up allright, with a little bit of improvisation. The shade was great while it lasted (the shelter, that is). On that fateful July 20th, the rains came. Well, that's a bit overdramatic. Let's just say we had a pretty good shower. Now, one of the key properties of water is is that it is fairly heavy. It started to collect in one of the pockets of the cover of the sun shelter. Once enough water collected, it just plain collapsed. Shoulda known. It was a sun shelter not a rain shelter. Back to Canadian Tire to get my money back.

- August 2nd. So far we had blamed all our troubles on Ronny, my nephew from the Netherlands. After all, all this began the day after he arrived. However, he left on the 22nd of July and on August 2nd, we were once again hit by a terrific thunderstorm, in the middle of the night (1:30 to be exact). It woke me up, and it seemed to come on so fast that I told Anne: "Into the basement!" So we scurried on down, into the storage rooom, to wait this one out. Once things settled down a bit, we went upstairs and peeked outside, to see the table + umbrella blown over again (the umbrella was down), along with chairs and, once again, Anne's bookshelf with the last of the glass shelves now broken as well. We did a closer inspection at first light and noticed that the umbrella, which had landed against the kitchen window, had produced a hairline crack in that window. Umbrella busted for good. Solution: junk it.

Now, this last thunderstorm did quite a trick on trees in the neighborhood as well: there are about 10 trees down in our forest, with the path completely blocked. It took the top out of the very tall maple in my neighbour's yard, which, of course, had to land in our front yard, so now I'm stuck with it.

More about the storm here and here. Surprisingly, we never lost our hydro.

This storm was the end of five days of 35+ weather. Some days produced humidex readings of 46! Talk about your wet blanket!Now we've been down to 25+ with fairly low humidity readings, just perfect!